


UPDATE mid-March 2023
It’s working: Arduino-Based RFID-Readers for JMRI – To make this short upfront: I’ve been able to successfully scan labels (multiple EM4100) using four separate RDM6300 and two GWIOT7941E RFID readers connected via three Arduino NANO and transmit them via USB serial connections into JMRI: Here is the Project page.
Original Post
How is this possible, even though neither my 13.5MHz RC522 readers (which I haven’t tested) nor my 125KHz GWIOT 7941E or RDM6300 readers are listed as a compatible hardware? The short answer is „data emulation“. And a rather crude one, that is.
So after spending eons of time researching the matter, I seem to have a useable approach (for me) this time. I will post my finding and some code on the (new) project page linked above, when (if) I get some spare time.
See, I bought these RC522 13.5MHz RFID/NFC-Readers and these GWIOT 7941E/RDM6300 125KHz RFID-Readers years ago. It would be rediculous to scrap them and turn to a commercially available concentrator board (which also requires at least a one year membership with MERG – which I wouldn’t mind at all, but that’s not the point), which in turn requires specific (more expensive) RFID-Readers to accomplish what I want. Or to turn to an entirely commercial system like „StarfishRail“ or „TrainTraxx“ (those systems are undoubtly great and have a very significant advantage: they are made by professionals and offer corresponding support if things don’t go als desired).
The BC Northern Railway however is a dream, that I want to be able to accomplish and turn into reality, even if recession, Ukraine war-effects and 7+% inflation rip my hard earned money from my wallet. So least cost ist the major practical approach here.
Least cost does not necessarily mean the same for anyone. For example, I have numerous micro-controllers and sensors and whatnot in my electronics box, that won’t cost me a thing now (but would cost you, as a potentially interested modeler, some money). So lets just say this is the most cost-effectice approach for my situation.
Furthermore, this is not a one-size-fits-all approach. It will not scale well under all circumstances. Just be warned. Let’s start and dive right into it.
Basic research regarding JMRI usually starts here: Hardware Support: Using Arduinos with JMRI
And then for RFID goes on here: Hardware Support: RFID Readers
Design Approach
You have to have an Arduino Uno (in my case several Arduino Nano) and you have to have an RFID-Reader of some sort. All you need to accomplish as a prerequisite is a way to scan a tag and show the Tag-ID on the serial monitor inside the arduino IDE or an LCD dislay. As long as you find a tutorial that provides you with this pole position, you’re set. The rest is a piece of cake.
Here are the readers that I have experimented with in the past.
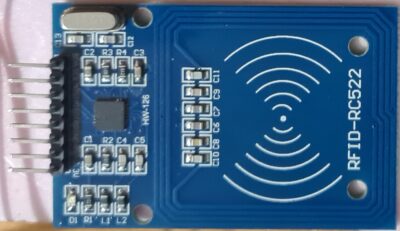
RC522 13.5 MHz RFID-Reader
Tutorial/Ressources (YouTube-Video-Links)
- Arduino Nano + RFID-RC522 – Arduino Tutorial
- RFID Reader RC522 mit ESPs und Arduinos – neuer upload| #EdisTechlab (german)
Wiring schematic for an Arduino Nano (that is essentially pin-compatible with an Arduino Uno, but much smaller).
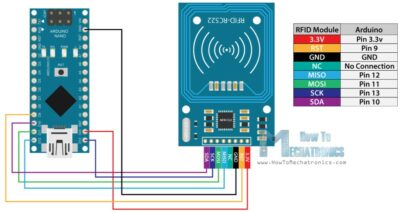
As you can see in the image above, there are 8 PINs on that board, of which 7 need to be connected to the Arduino Board (for full functionality). You might be able to imagine that this might become cumbersome when more than one (possibly many) readers are connected to your development board. Each reader costs about 5,50 Euros (and up, depending on the seller and location) and usually comes with the board and a few tags. These are 13.5 MHz UHF MIFARE 1K compatible as far as I know, but check the tutorials for more info, please.
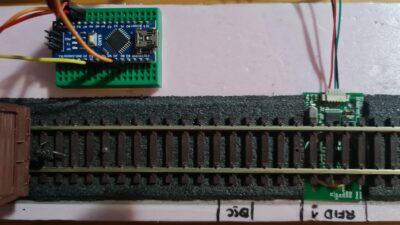
I had three of these readers (one died to early. But only the good…) and lots of very small tags that even fit beneath N-Scale cars. For this small number of readers I think the wiring is manageable and worth the effort. These readers have a very low range. Mounted directly under the sleepers or roadies of N-scale or HO-scale track and the tags mounted on the underside of each car. This worked quite well, as you can see in these videos.
Above in HO-Scale and below in N-Scale
The readers are fast, though. You can practically throw your tag past the reader, and as long as it’s in range (for this purpose less than 15mm), it will probably be detected.
GWIOT 7941E 125 KHz RFID-Reader
Turtorial/Ressources (YouTube-Video-Links)
- GWIOT 7941E Library, schematic and sample code for Arduino and ESP
- Output data format (ny Quickfix)
This board outputs Wiegand (so not only the serial of the fob in plain format) in the following format:
– Data Head = 0x02 (fixed byte)
– Length = 0x0A (total length of the packet is 10 bytes for 125kHz fobs)
– Card Type = 0x02 (EM4100 = 125kHz chips)
– Card Serial = SN0~SN4 (5 bytes)
– BCC Check = XOR Check (Except Data Head And Data End)
– Data End = 0x03 (fixed byte)
Wiring schematic for an Arduino Uno (that is essentially pin-compatible with an Arduino Nano, but much larger).
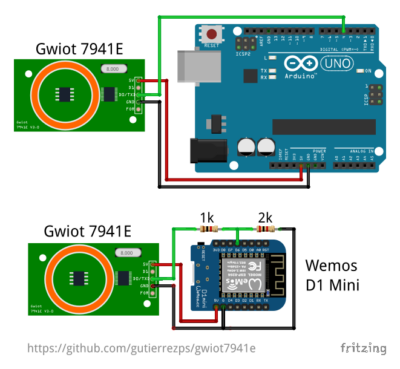
I had these readers for a few years but never tested them. They are much simpler to wire (only three wires – GND, VCC and a digital PIN) and have been very easy to work with so far. Detection range is 25 mm under the track as shown, but the reader is comparatively slow (the 13.5 MHz ist more than a 100 times quicker, but usually transmitting more complex data).
Implementation
As is well known, the Arduino Uno/Nano only has one hardware serial port and can have one software serial implementation, which blocks the hardware interrupt for the hardware serial port when in use.
However, using the AltSoftSerial Library, one can implement a second software serial bus, which is the method I’d like to present here (and which was successful for the most part).
Looking into the libraries, I was able to see some similarities to the implementations that use no library at all. The library packs functions to an external file. So theory it should be possible to write a sketch that can work with all three readers equally well. But that’s something for the (distant) future. For my model railroad, I only need a handful of each, so managing a different sketch for each reader isn’t too much of a hassle. Also, the arduinos don’t need to be optimized or „failsafe“ or „secure“, the only need to work. My code is allowed to be messy.
Alternatives like ESP8266 and ESP32 based connectors like discussed here: https://groups.io/g/RFID4MRR/topic/98726490#435